===================
Reprinted Courtesy of; http://castboolits.gunloads.com/showthread.php?49003-303-Lee-Enfield-accuracy-article
By; JeffinNZ: Here is an article I had published recently in NZ.
Chasing Lee Enfield Accuracy.
“Psychiatric admission in 6 easy steps”.
There are, in this world, a good many irrefutable truths. For example; “What goes up must come down”; ask a pilot. “There are no bones in tripe”; a butcher will confirm this. “Two wrongs don’t make a right”; I know, I’ve tried. And my all time favourite, “You can’t make a silk purse out of a sow’s ear”. The final example relating to ladies accessories and swine appendages is particularly worthy of note in terms of battle rifles or more specifically the British Lee Enfield .303 series of firearms.
YOU WANT THE TRUTH? YOU CAN’T HANDLE THE TRUTH!
Here’s the bottom line. The most accurate bench rest rifles in the world have:
One piece stocks
Light match grade triggers.
Premium grade, heavy weight, air gauged, free floating, cryo relieved barrels.
Robust, cylindrical, front locking actions.
High magnification telescopic sights.
All these factors when combined with an inherently accurate cartridge, precision loaded ammunition and a component shooter lead to a super accurate rifle.
Now let’s run through that list of points and see which ones apply to the Lee Enfield .303 shall we?
• Two piece stocks with top woods, tension devices and nose caps.
• Two stage military type trigger, let off in the region of 6 pounds.
• Mass produced, skinny, whippy barrels that don’t ‘float’ in the stock.
• Rear locking actions, milled from square section with narrow, flexible side rails.
• Metallic sights, open or aperture, a scope on a “T” designation rifle.
Right, none of them. So the Lee Enfield is not a precision rifle and neither was it designed to be. In fact it is everything a target rifle is not. This tremendous revelation does not make the Lee Enfield a bad rifle though (he said as the tears of a thousand die hard .303 fans soak the pages of this magazine). Absolutely not. After all, it is a battle rifle design for shooting, diabolical as it may sound, people and there is no shortage of historical evidence to suggest how effective it was at this task.
What I am trying to say here is the Lee Enfield (LE) was not designed as a tack driver and as such when referring to its accuracy potential our expectations of its abilities should be realistic and in line with this. Yes, it has been used very successfully in competition but by and large this been against like firearms so a level playing field. You don’t see many, if any, at the world benchrest champs.
So what can it do then?
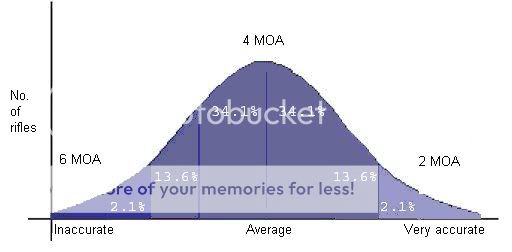
Like any mass produced mechanical device the LE rifles show dimensional variances due to manufacturing tolerances. As a result periodically a factory would produce a rifle that would shoot outstandingly well however conversely and at the other end of the scale there will be as many rifles had won’t shoot worth a damn. Statisticians refer to the normal distribution or bell shaped curve (Fig. 1) where most of the range is grouped in the middle with edges or extremes containing the “exceptions”. The very accurate rifles are at the right end, the “inaccurate” rifles are at the left end and the average or “typical” rifles fall either side of the middle. The area under the curve represents the physical numbers of items in the sample so we can see that the numbers of rifles (for this example) in the extremes of accuracy would be very small.
NOTE: The ‘flags’ of 2, 4 and 6 MOA are representative only for this example.
Fig. 1
So what do the experts say about LE accuracy?
Skennerton, Lee Enfield Story (1993ed.), p212:
“Accuracy tests for the No. 4 sniper rifle involved placing 7 out of 7 shots within a 5 inch diameter at 200 yards & 6 out of 7 shots into a 10 inch diameter at 400yards.”
From this report then the minimum standard for No. 4 “T” sniper rifles was 2.5 MOA out to 400 yards for at least 6 shots. In the case of the “T” series of rifles, these pieces were hand picked to begin with and then worked over completely by an armourer in order to maximize the accuracy potential. The rifles were still feed service issue Mk VII ammunition though my understanding is precision shooters used a “gauging system” to measure all ammo to allow rounds to be sorted into batches for peak performance. No doubt tailoring a specific handload to each rifle would have allowed for a greater degree of accuracy again but of course in times of conflict this is not practical. A latter day standard is a generic premium load IE: US GI National Match ammo. Sniper rifles aside what can a “standard” issue SMLE or No.4 rifle be expected to produce in MOA terms with Mk VII ammunition (174gr Spitzer bullet at 2440fps)?
Lynn Harris, Guns & Game (1998), p94:
“In simple terms, the accuracy requirement for the SMLE rifle on manufacture was that at 100 feet, four out of five shots must hit a rectangle measuring 1 inch wide x 1.5 inches high, which is roughly equivalent to the often quoted standard of 3 inch groups at 100 yards. As a further requirement, 10 percent of the rifles were then fired at 600 yards, where nine out of the 10 shots had to fall within a two foot circle.”
I personally feel the late Mr. Harris was a little generous with his “3 inch groups at 100 yards” statement as the extremes of the group could be 4.5 inches and THAT was only 4 of the 5 rounds. Where the fifth round ended up was anybody’s guess. In short if your unaltered, as issued SMLE is shooting inside 4 inches at 100 yards with military ammo you are getting better than minimum factory specified accuracy.
OK, rifle aside, what did the authorities expect from .303 Mk VII ammunition?
Lynn Harris on .303 Mk VII ammunition accuracy, P96:
“….we find that a consignment passed if the batch undergoing examination did not exceed a Figure of Merit of 8” at 600 yards.”
‘Figure of Merit’ is defined by SAAMI (Sport Arms and Ammunition Manufacturers Institute) as : “One method used to measure ammunition and/or firearm accuracy capability. To determine the mean radius, the center of the group is located, and the distance to the center of each shot from the group center is measured and recorded. The sum of these measurements divided by the number of shots is the mean radius.”
In order to find the “true” middle of the group draw a vertical line through the middle of farthest left bullet hole and a horizontal line through the middle of the ‘southern most’ bullet hole. Measure the distance to the centre of each hole from each line and divide the sum by the number of shots. See figure 2.
Fig. 2
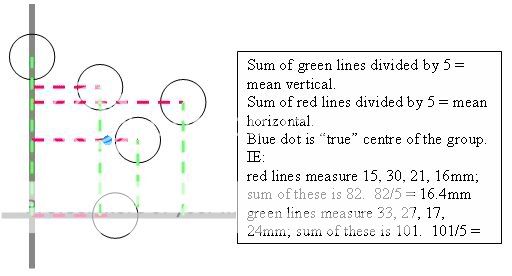
From this we can see that “Figure of Merit” is what the Americans call “Mean Radius”. As such eight inch “Figure of Merit” at 600 yards is equivalent to 16 inches ‘across the beam’ (on average) as the diameter of a circle is twice the radius. Therefore and in terms of minutes of angle 16 inches at 600 yards is a nominal 2.67 MOA (16 divided by 6). This is was the minimum standard for Mk VII ball ammunition.
To recap it’s worth remembering that the standards for the rifle and ammunition above are the WORST case scenario or MINIMUM standard so in terms of our friend the standard deviation curve these numbers would fall to the far left. We could expect better results than this from most of the sample of rifles and ammo and a SMLE burning Mk VII ball ammunition might realistically be expected to shoot between 3 and 4 inch groups at 100 yards.
Another interesting figure from Lynn’s book, though not related to the LE or Mk VII round, is that the minimum standard or US National Match 7.62 NATO ammunition is 3.5 inch mean radius at 600 yards. That’s basically a maximum of 7 inches at 600 yards or a shade over 1 MOA! Not bad for mass produced military ammo.
Now that we have established a realistic performance standard from a factory rifle burning factory ammunition how can we go about tweaking both sides of the combination in order to achieve great grouping ability and prettier targets?
Considerations for post military accuracy.
There are a few things to consider when attempting the wring the tightest possible groups from your LE rifle. They are internal barrel dimensions, barrel condition, stock bedding, barrel pressure points, sights and reloading ammunition. Let’s look at each individually.
– Internal barrel dimensions.
Nominal dimensions are bore .303, groove .311. HOWEVER war time LE rifles are renowned for “generous” bore and groove dimensions. I have heard of groove diameters as tight as .309 and as loose as .322! Jim Allison of Cast Bullet Engineering in Australia tells me that every bore he has measured though is spot on at .303 inch. Strange how the bores can be consistent but the grooves extreme in dimensions. Fortunately for me both my SMLE and No.4 MkII have post war barrels that are good and tight at .311-312 in the groove. It goes without saying that if regular size projectile (.311) is launched down an grossly over size bore the accuracy results are most likely going to be disappointing. I have had very good results with .310 bullets (lead core) in .312 grooves but I sure wouldn’t want to run a .310 projectile down a .315 or .316 groove barrel and expect to win a match. Rattle is a word that springs to mind. I advise that the LE owner slug their barrel to establish the internal dimensions and match a bullet as closely as possible. Slugging is very easy. Acquire a soft lead slug EG: 36 cal round ball or fishing sinker and apply a light coating of the oil to the bore. Start the slug in the muzzle with a soft face hammer and once the slug is inside the barrel push it through with a cleaning rod. Measure the slug and record the details. Five groove barrels generate a bit of a challenge in measuring and this is properly done using a V block. Ask your gunsmith or a machinist to assist.
– Barrel condition.
When we consider that LE rifles were first manufactured in the late 1800’s and ceased Western production in the mid 1950’s we suddenly realize that the youngest are 50 years old and the oldest over 100! Many have been FTRed (factory thorough repair) at least once (my SMLE has been done twice!) and possibly had new barrels installed while still in service but equally as likely is there are still a lot of ‘seen combat’ barrels in place on LE actions some of which will not be pretty. A frosted or pitted barrel is not necessarily all bad however. I once owned a model 92 Winchester in .32-20 that had a barrel that, internally, resembled a dry river bed but it shot like a house on fire. There’s no telling till you try. I prefer mint/pristine condition as this removes one more variable from the black art that is LE shooting especially when sending cast projectiles down range. ‘Trademe’ online auction site still turns up a few “unfired” SMLE barrels and a lucked onto a brand new BSA No.4 barrel only a few months back so replacements still exist. Or, shout yourself a brand new barrel; MAB in Australia make a .311 tube.
If you REALLY want to get serious how about converting to .223 calibre? The following link to the Surplus Rifle website tells of how a good keen Ozzie shooter converted his No.4 to 5.56mm.
http://www.surplusrifle.com/shooting/no4223/index.asp
– Stock bedding.
In order to generate consistent vibrations and thus consistent accuracy from shot to shot the stock and action must be mated as closely as possible. Critical bearing surfaces need to be matched and mated that they remain in contact as all times without deviation. The most straight forward way to achieve this in our modern age is to apply a synthetic bedding compound that adheres permanently to the stock and takes a perfect impression of the action thus creating a match of the two pieces that does not alter. The stock and action may be separated (provided a release agent is used at time of bedding per the instructions….yes, read them) and as the bedding compound stays intact in the stock with an impression of the action when reassembly takes place the mating is once again perfect. Upon discharge of the rifle the stock and action vibrate in the same manner each time. LE action bedding is very similar to any other bolt action but the critical areas are per figures 3 and 4. Some discussion exists as to whether the Knox Form (chamber area of the barrel) should be bedded. I have shot my No.4 MkII with this area both bedded and floating and can not detect any difference. I guess this is a “suck it and see” situation. The same can be said for the area where the rear faces of the foreend wood meet the front of the butt stock on the receiver (see figure 3, red star). When I first bedded the No.4 MkII I merrily slopped bedding compound into this area and the rifle really played up spraying shots all around. I removed the compound and left a void between metal and wood and the accuracy returned. In contrast my SMLE has this area bedded and is perfectly happy about it. The benefit of using compound is that it is easily removed should you discover a negative effect an as such I tend to use it with gay abandoned and should the results not be favourable – out it comes.
Fig. 3

Fig 4.

– Barrel pressure points.
Rifle barrels vibrate when the firearm is discharged. They vibrate up, down and sideways. The amount of vibration is proportional to the wall thickness of the barrel IE: thicker barrels vibrate less violently than skinny barrels proportional to the bore diameter. A one inch diameter barrel in .224 calibre will vibrate less violently than a one inch barrel with a .50 calibre hole down its centre simply because the walls are thicker and more resilient to movement.
This is where the fun begins with the LE rifle. LE barrels are skinny. The purpose of this is to keep the weight of the rifle in a usable range for the foot soldier. The down side such a light weight barrel is that on firing it flaps around like a window curtain in a Canterbury nor’wester. Further, light barrels heat up very quickly and the combination of these two factors is greatly increases group size. One way of minimising the effects of the barrel vibrations is to introduce points along the barrel where packing is used to hold the barrel tight between the top and bottom woods. Pressure pointing, as it is known, dampen the sine wave generated by the node and antinodes of the vibrations and go some way to simulating a stiffer barrel. Both my SMLE and No.4 MkII have show very favourable improvements after the addition of carefully placed bedding points.
So where do the pressure points go I hear you ask? There are two schools of thought here – at the muzzle only and at the muzzle and middle. Muzzle pressure is standard with both No.1 and No.4 rifles and in theory they both left the factory with 4-6 pounds of upward pressure on the muzzle end of the barrel. See figure 5. If a rifle has a factory pressure point I would remove it and start from scratch – this way I can control and changes and alterations. My SMLE is pressure pointed at the muzzle top and bottom with layers of firm cardboard whereas my No.4 MkII is pressured pointed at the muzzle on the top side only with 1/8 inch engineers’ felt. The No.4 did not respond at all well to upwards pressure on the barrel nor did it like top and bottom force. The benefit I have found in using cardboard is that layering can be used to increase the depth of the pressure point and subsequent pressure and this allows a range of variance to be trialed to establish the best. A base of bedding compound would work equally well and shims of thin media could be added to experiment with great load.
Fig. 5

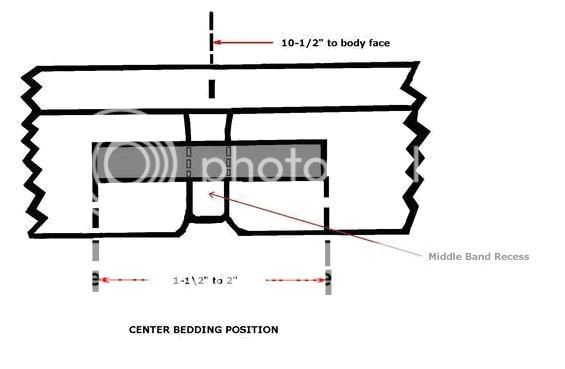
The second area for barrel pressure pointing is under the middle band on the foreend that holds the top woods in place. British competition shooters used to cut a rectangular recess in the barrel channel straddling the middle band and glue a block in place formed to meet the contours of the barrel. This centre bearing block was quoted to apply 12-14 pounds of upward force to the barrel and seriously dampen the vibrations. Figure 6 shows this location and recess. My No.4 MkII has had such a block as the recess remains though not over the middle band however I pressure pointed the barrel top and bottom using felt once again and when the middle band is fitted to the wood work the barrel is held solid all the way around. This works extremely well for this rifle though the SMLE utilizes cardboard top and bottom for the same effect. Much like the action bedding this is a trial and error process and I established the best combinations for my rifles by developing a handload that I knew shot well then spent time at the range shooting the same load at the same range and adjusting only the pressure points.
Fig. 6
I have had no success in free floating a LE barrel in the way Mauser action rifles are. Even my MLE action .38/303 wildcat BPCR rifle prefers a pressure point in the shortened foreend. Horses for courses really. Listen to your rifle.
For more on accurising the Lee Enfield visit http://enfieldrifles.profusehost.net/index.htm The site owner, Mr Jay Currah of Canada, was very gracious in allowing the author to use material from his most valuable site. An excellent resource.
Lee Enfield Sights.
Battle sights are not designed for precision shooting. In fairness the SMLE has really good open sights that my ‘pushing 40 years of age’ eyes quite like (obviously my mother was wrong about me going blind!) but these sights don’t allow for the same degree of accuracy that a quality target aperture sight will. The same goes for the No.4 rifles with their variety of peep sights. Fortunately there remains a good supply of second hand Parker Hale (PH), Central, Singer and countless other types of the target sights designed fit LE rifles and calibrated to the Mk VII round. I have a PH5A for my SMLE that attaches without alteration to the rifle thus retaining is ‘original’ state and a PH5C for my No.4 MkII for which one hole has been drilled and tapped for fitting. The PH5A has an eye piece with a disc of varying sized apertures and the PH5C has an iris like the human eye and a dial with a disc of coloured filters (blue, green, yellow, opaque, clear) for varying light conditions. The addition of these sights greatly increases the potential accuracy of the rifles.
Telescopic sights can also be added and numerous mounting systems exist for said. My No.4 MkII has a quick detachable mount using a rail mounted on the left side of the receiver. The scope rings attach to a bridge style mount that slides on and off the rail returning very close to perfect each time. Using this I can make my No.4 into a faux No4(T).
Lee Enfield Reloading ammunition.
The days of blazing away en mass with military surplus Mk VII .303 ammunition are long gone for most of us. A few astute shooters covert stashes of CAC 54/55 ammo and the likes but by and large .303 ball ammo is no more. Quite simply, once the 7.62 NATO round was adopted there was no call for further production runs of the venerable “three oh three” so it stopped 50 years ago. What is surprising to me however is the state of preservation of the vintage CAC ammo and that it still shoots remarkably well to this day.
Lee Enfield hand loading
The .303 British round is a prime candidate for handloading. Components are widely available and with the variation in internal dimensions of chambers and barrels a well developed handload is often the only way to extract the very best accuracy for a LE. Without going into too much specific detail to handloading, numerous books on which exist, there are a few .303 specific rules I follow.
i. I fire form all new brass by flaring the case mouth to fit tight in the chamber neck and charging the lightly oiled case with 15gr of fast powder (eg: Green Dot) topped of with corn meal. On firing the case forced back against the bolt head then expands to match the internal dimensions of the chamber. The oil allows the brass to slip in the chamber and the flared neck helps keep the case centralized. The case will expand both longitudinally and radially and create a headspace between the chamber should and bolt face as per rimless cartridges. It is this headspacing that goes a long way towards greater case life.
ii. Once I have fire formed the cases I use only a Lee Collet die for neck sizing in all subsequent loading to avoid working the brass and shortening the life of the case. Neck sizing with neck sizing dies will not alter the position of the case shoulder and the headspace generated by the fireforming action above will remain constant. This practice greatly increases the number of loading cycles a cartridge case will withstand as the brass is not being overworked (expanding on firing and sizing during loading) and due to the shoulder headspacing the case will not stretch lengthwise as such a great rate as full length sizing would promote.
iii. I anneal case necks approximately every 5th firing. My No.4 MkII is very fussy about neck tension and as the brass is work hardened on firing and sizing the tension begins to vary and this is reflected on the target. Neck walls on .303 brass are very thin and annealing will prevent necks splitting. Interestingly enough .30-40 Krag brass can be shortened and fire formed with good results in .303 British chambers in order to get a case with a heavier neck wall.
iv. Load projectiles that are as close to groove diameter as possible. Bullets are available in .310, 311, 312 commercially and .313, .314 and .316 from boutique sources. Cast bullet shooting allows the handloader great control over bullet diameter again. I match my cast bullets to the chamber THROAT diameter these days and in the case of both of my LE’s I size cast projectiles to .314 with great success.
v. Remember the limits of the .303 British round and don’t try and “magnumise” it. You will definitely burn out brass quicker and likely damage your rifle(s) and person by asking more of the round than it can give. If you must chase high velocity with your LE please consider the .303 Epps; an improved, blown out version of the .303 British developed by Mr Epps of Canada matching .30-06 performance. Search the internet for Epps details.
A word of warning for competition shooters. Before launching into the accurising process make sure to be totally familiar with the rules of the clubs you are likely to compete with. Certain service rifle events call for true “as issued” rifles IE: EXACTLY as they left the factory. Others allow for modifications to specific levels only so best be safe than sorry and get the information PRIOR to any modifications.
So there you have it. Everything that has worked for me and some. I can’t reinforce enough that to be fair to yourself and your rifle(s) your expectations of what a LE can do should be realistic. With a lot of after factory work and time my No.4 MkII is a reliable 2 MOA rifle now and on a good day (for us both) it will go sub 2 MOA. The best it ever turned in was 0.875 inch at 100m with cast bullets as witnessed by a local shooter. A combination of good luck and hard work. When my eyes allow the SMLE with tailored cast loads is a 2 MOA rifle also. I firmly believe that 2 MOA is a realistic expectation of LE rifles but anything better than this is a bonus. My believe if based on my experience with 5 and 10 shot groups at 100m.
I don’t quite know why these rifles are so addictive but I guess it is probably because they have played such an important part in our past. There is a huge amount of history in the Lee Enfield and it is our passion for them that will keep the three oh three and LE going for many years to come. My latest addition to my LE stable is a wildcat .303 “Pygmy” – a .303 case cut down to 1.5 inches in length for reduced loads.
Stay tuned for this unique LE.
=============================================================
Lee Enfield Accurizing – Tuning from the Experts
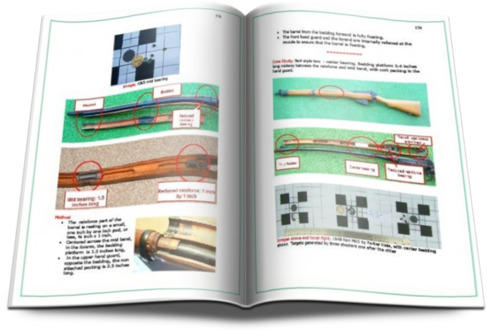
Need to accurize a 20th century Lee Enfield, no matter if it’s a No1, No1 MK3, a No4 Mk1 or Mk2, an Ishapore 2a 7.62, and even the jungle carbine?
Strong on the practical and light on the theoretical, ‘Complete Accurizing’ is a friendly and thorough book that suits beginners and all home handy and innovative shooters.
==========
Want to make a stock rifle as accurate as possible to compete in military type shoots that require no changes from as issued?
No problem.
Want to make a dragon slaying, target chomping machine just for the hell of it?
No problem.
Want to recreate a Lee Enfield sniper rifle and then make it shoot like one, or better?
No problem.
Want to keep your Enfield all original and as accurate as it was intended to be?
No problem.
Far from being a repeat of the most common ideas this book looks at how it was really done decades ago by the master shootists and gunsmiths, with well described photos backing up every interesting point. The text also includes ‘Old Timer tricks’, tips that hardly ever made it off the range and into the history books.
And then just to kick the ball another length there are 25 pages devoted to new ways to accurize an Enfield that have probably never been done before.
What about a carbon fiber barrel on your Lee Enfield, to line up next to the hi tech range rifles of today?
“What, say what?!”
Yep, carbon fiber barrel, no problem, and I bet that’s got you thinking. Perhaps a 1966 Ishapore 7.62 target that looks like this would get your attention?
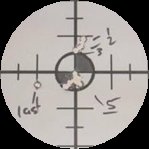
Project carbon fiber
==========
You get; 200 plus pages of concrete information you can put into practice, with all the step by step directions to get you there. Engineering degrees and British accents are not required, just common sense and everyday man cave tools.
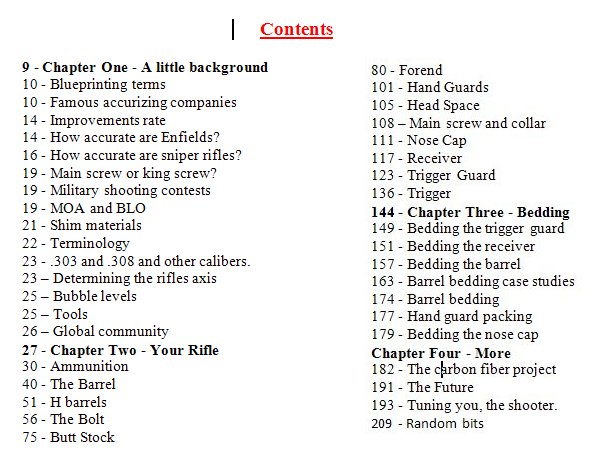
The index
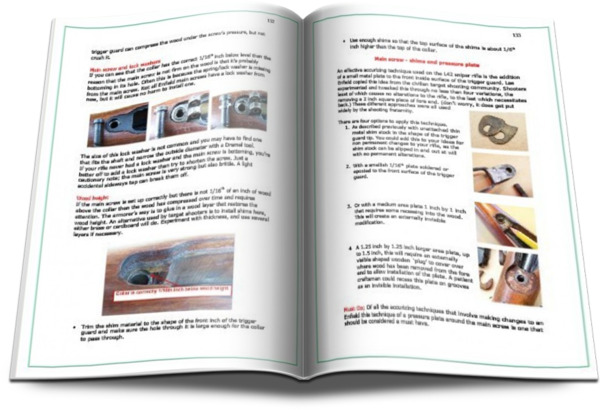
Every accurizing technique is demonstrated with photos, up close and in place on Lee Enfields, either stock, target rifles, new, old, vintage and home accurized. In addition, the barrel bedding methods are illustrated with actual case studies. Rifles with each barrel bedding technique are opened up, measured, photographed and where possible targets produced – two methods for each of the No1 Mk3, the No1 Mk3 H barrel and the No4 MK1 and Mk2, and in some cases there are three methods shown.
Accurizing techniques described here will pay as much careful attention to techniques that are mild to wild, as to the ones that allow you to get the most out of your totally stock rifle.
 Who am I? A Hollywood writer and set designer until 2006, I grew up in New Zealand and have owned a rifle since 16. A friend turned me onto a smle in 1995, and I’ve been hooked on the great defender of empire ever since. I was lucky enough to live close to an 800 yard range and spent years knocking down steel plates on the weekends. Health changes spun things in new directions and I don’t shoot as much as I’d like these days, but I have a great man cave and am a born tinkerer. After discovering literature about accurizing the old .303 back in the Golden Era of target shooting and seeing it work on my own rifles, I was well and truly hooked on this part of Enfield history. I’ve spent the last 4 years entirely focused on investigating the old target rifles, and after many requests to put it down on paper, here we are, a work on Enfield accurizing as may not be for sale anywhere else.
A sample of unsolicited comments from happy buyers.
- ‘Book arrived today. Real Gem. Thank You’.
- ‘… very thorough and very educational.’
- ‘ … Very much enjoying the book.I am glad to see someone capturing/reviving the art of tuning Enfield rifles.‘… I’ve had a quick look at the ebook and it looks great.
- ‘You have written a very, very interesting book. I could say it’s the most comprehensive book about accurizing techniques among the entire Enfield world.
- ‘ Congratulations on an an excellent book. I will recommend it to some of my colleagues.’
- ” I have to say a great ‘Thanks’. Today I shot my 2nd Enfield No. 4. (Following your book) I did these things –New wood under main screws in contact with trigger guard with a soldered steel plate and bedding —Bedded both ends and grooves of trigger guard. —Created 7 pound upward pressure at the barrel tip. Fore end was warped so i opened up a little and made good contact with some bedding compound —Patched the draws and bedded with devcon to have a more strong contact. —Filled with bedding compound 0.4mm gap between fore end and butt stock. Now my rifle shoots 1 MOA with consistency. Its a dream. Many many thanks.’
- “ … congratulations and well done on the publication of your book. It is by far the most concise and encompassing publication dealing with the subject of accurising the Lee Enfield rifle yet. I am impressed both with the style it’s written and supporting diagrams and pictures. I like the format, It’s informative and very clever, again well done. As an aside, It’s caused more than a few rifles in my collection to be dusted off for potential projects! But what is really neat is because of your book, we may now hopefully see more of the old girls given a new lease of life and on the firing lines.” M.B.
- March 29 2014; ‘Hello RJW, I have been through the online download and just received your book. Ive been shooting these things since 1962- competitively since 1992 and I have never had such a comprehensive, well-explained, clearly illustrated resource such as this. An absolutely brilliant production – superb! All the best, D.M. Australia
The compliments are great to hear, and they keep coming too, but I’ve really put them up so that you can get a feel for the satisfaction fellow shooters are finding in the book.
* * * * *
“My aim in writing the book has been to not only round up some of the spread wide, often casually mentioned, accurizing information about Lee Enfields but it is also to encourage ways of looking at your rifle that will get you thinking afresh. The old masters were very in tune with their rifles, and that’s a great connection for us to re discover”.
RJW, author.


